Showing posts with label Projects. Show all posts

Project - Howl's Moving Castle

    We didn't do a project for Howl's Moving Castle. But here are some ideas for your book group project.
    Make a wizard hat - http://familycrafts.about.com/od/costumeacces/a/wizardhat.htm
    Make a magic wand - http://www.pacon.com/projects/MagicWandCraftProject.htm

    Conjure up your own spell. Make a list of interesting items that would go into a spell and then try to make it rhyme. For example:
          What a wonderful spell this would be
          If I mixed sugar and a bit of tea
          Add some water and lemon drops too
          And let's find something that will make it blue

    You get the idea...

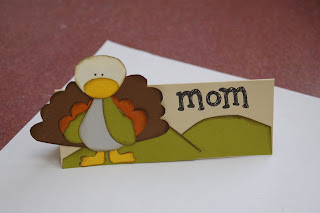
    Project - Mother Daughter Book Club: Dear Pen Pal (Thanksgiving Place Cards)

      This project wasn't linked to any book but after reading the 3rd book in the Mother Daughter Book Club series, this seemed to fit.

      We also wanted to let our readers know how thankful we are for them. We are also thankful for our books and for our blog. So this project seemed perfect for that reason and for this season. (If you think of a good Thanksgiving themed book to do a schedule for, please let us know.)


      Supplies:
      • Scissors
      • Kraft brown cardstock
      • Green cardstock
      • Yellow cardstock
      • Grey cardstock
      • Orange/rust cardstock
      • Brown cardstock
      • Cream cardstock
      • Thin black marker
      • Ink
      • Cosmetic sponge
      • Glue stick
      Note: we found a pack of autumn colored cardstock at the local Michaels which was perfect for this project

      1. Download and print this template . Then cut the pieces for your place card. When you finish cutting, your pieces should look something like this:


      2. Cut a piece 8.5"x11" kraft brown cardstock into quarters (each piece 4.25"x5.5"). Fold the cardstock in half, crease and open.

      3. Use cosmetic sponge and ink to shade the edges of each piece.

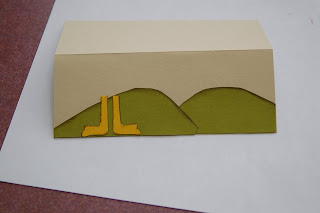
      4. Attach first green hill to the cardstock.


      5. Attach second green hill to the cardstock


      6.Attach pieces in the following order:

      • yellow legs
      • brown back wings
      • orange/rust wings
      • left green wing
      • grey turkey body
      • right green wing
      • cream head
      • yellow bill
      --------------------------

      --------------------------

      --------------------------

      --------------------------

      --------------------------

      --------------------------

      --------------------------


      7. Using a thin black marker, make the dots for the eyes and write in the name.

      8. Have a happy Thanksgiving!

      Projects - How to Make a Paper Football (No More Dead Dogs)

        A good way to while away the time on a rainy day is making and playing with this paper football. You can decorate them anyway you want, too.

        Supplies Needed:

        - Piece of Paper
        - Scissors (optional)

        1. Fold a piece of paper in half vertically (long way). Tear or cut the paper along the fold.


        2. Fold the remaining half in half again. Crease the fold well with the scissors or your finger nail.


        3. Hold the paper vertically and fold the top corner down to meet the opposite edge of the paper, forming a triangle.


        4. Fold the triangle over again and again until there is no paper left to fold.


        5. Make a tab with the remaining paper and tuck it into the pocket of the paper.


        6. Color or decorate.

        Projects - Make a Vision Book / Board (Every Soul a Star)

        Bree’s “Book” was very similar to what we think of as a “Vision Book” which is another form of a “Vision Board”. In this busy world of radio, TV, iPods, cell phones, Internet, it is easy to get distracted from one’s goals. A vision book, or board, is a tool that people use to keep their dreams, desires and goals in the forefront of their thoughts.

        It’s really a simple but effective tool. Several years ago, I made a vision board. My theme was fitness. I posted it right next to my desk. It reminded me to get in a little bit of exercise every day. Since that board, I’ve dropped 10 of those extra 15 pounds AND I’ve made exercise a more regular habit.

        Vision books/boards should be a guide not the rule. Be flexible with your ideas. Remember in Every Soul a Star, Bree used her book to keep her ‘eyes on the prize’ as far as modeling went. Life threw her a bit of a curve ball in the form of going to Moon Shadow Campground. Do you think that her book would be as important once she’d been at Moon Shadow for a while? Maybe it won't be but we hope that it would. The book was a great example of her persistence towards achieving a goal. If her goals change, perhaps her book could ‘morph’ into something else too. Her persistence was an excellent quality and we wouldn't want it to change.

        Do you have a goal or goals that you’d like to pay more attention to? Here is a way to make your very own vision book or board:

        To make your vision book, you’ll need:
        Notebook (use poster board or foam core for a vision board)
        Magazines
        Newspapers
        Scissors
        Glue or double-stick tape
        Pens, pencils, crayons

        1. Pick a theme – ours was cooking but yours could be anything. (Note: A theme is just a suggestion. This is your book, it can be just a general gathering of hopes or desires.)
        2. Choose a notebook - maybe one that has a nice design on the cover or one that has special meaning to you.

        3. Go through magazines, newspapers, and cut out pictures, titles, words etc. that are pertinent to your theme. You can also print photos and titles from the Internet.

        4. Make a collage by placing these pictures on pages in your book (or on your poster board). You can also write notes or affirmations in and around these pictures.

        5. Keep your book with you - you never know when inspiration will strike. Keep adding pictures, quotes and handwritten messages. Before you know it, your book will be full of inspiration. And if life throws you a curve ball, remember goals can evolve just as people evolve. Let your “Book” grow with you. (If you’re using a vision board, these same thoughts apply. Keep your board in view and try to look at it at least once every day. Update it as your goals and dreams come true.)

        Projects - The Mother Daughter Book Club

          Based on the story of Laurie and the March girls, we decided to make a birdhouse/letter holder. This was so much fun! And it really works to hold small envelopes. I wonder if anyone used theirs when they got home. It would be fun to play mailbox with a younger sibling.

          Supplies needed:
          Milk cartons
          Scissors
          Paper - white and/or colored
          Crayons
          Pens
          Tape or glue

          1. Save a few milk cartons - one for each member.

          2. Clean out the milk cartons and allow to air dry for at least a day. Punch hole in top ridge CAREFULLY (a grown up should do this.)

          3. Mark and cut the door of the birdhouse/letter holder. Only cut on three sides so you can use one side as a hinge.

          4. Decorate. Ideas for decorating - cover with colored paper. Or with white paper and color with crayons.

          5. Put string through hole and hang.

          Projects - Collage (Clarice Bean Spells Trouble)

          Draw the inside of your brain. Then decorate it collage style. This project is good for the meeting when you discuss Clarice Bean Spells Trouble.

          Supplies necessary:

          paper
          drawing materials
          scissors
          glue/gluestick
          various and sundry items for decorating*
          *Suggestions for other materials to use:

          macaroni
          feathers
          magazines
          stickers
          ribbon

          Projects - Mermaid Bookmark (The Tail of Emily Windsnap)

            SUPPLIES:
            - blue and green cardstock
            - white cardstock
            - beige foam sheet or yellow cardstock
            - markers
            - ribbon
            - glitter pen
            - yarn
            - double-sided tape or glue
            - Some sample supplies are pictured in pic 1

            INSTRUCTIONS:

            1. Cut white or blue cardstock to dimensions of a bookmark. You can use template found in the mermaid bookmark PDF file (pic 2)

            2. Cut foam (or yellow cardstock) into the shape of a mermaid’s head, shoulders and arms. You can use template found in the mermaid bookmark PDF file. (pic 3)

            3. Cut blue or green cardstock in shape of fin. (use template found in the mermaid bookmark PDF file)

            4. Glue or tape foam piece to bookmark. * (pic 4)

            5. Glue or tape to bookmark below foam. * (pic 4)

            6. Use yarn for hair OR color hair in with markers. (pic 5)

            7. Decorate with ribbon and glitter. (pic 5)

            *Make sure glue and decorations dry before using bookmark in a book. If using tape, make sure there are no exposed surfaces of tape that could damage book.
            Click on pictures to enlarge:


            Projects - Pea and Bean Mosaic (Poppy)

            A very colorful and easy project.

            SUPPLIES: (pic 1)

            dried peas and beans in various colors
            cardboard squares (4" x 4" or 6" x 6")
            market
            school glue (white glue)

            INSTRUCTIONS:

            1. On the cardboard, draw a mosaic-like pattern. Use squares, triangles etc. (pic 2)

            2. One shape at a time, fill shape with glue then spread a single color of peas or beans over that shape. Gently pour beans over the glue and press down firmly. Then shake off beans that don't stick. (pic 3)

            3. Repeat Step 2 with each section until complete. (pic 4)

            4. Allow to dry. (pic 5)

            NOTE: There is a lot of gluing in this project. Please get an adult if you need help with this.

            ANOTHER NOTE: If you intend to keep this project for a long time, have an adult spray it with fixative spray.
            Click on pictures to enlarge:


            Projects - Worry Doll (Pictures of Hollis Woods)

            These are also called trouble dolls. These are originally from Guatemala where it is believed that if a person can't sleep they should put a worry doll under their pillow. Then the doll will do the worrying for them while they sleep. In the morning, the worries will be gone having been taken away by the dolls.

            Supplies needed:

            ball-head clothespin (also called slotted clothespin)
            permanent market
            flat-head thumbtack (not pushpin)
            wooden matchsticks (head removed with scissors)
            scissors
            low-temp glue gun (or tacky glue)
            1. Draw a face with permanent marker on one side of the ball part on top of clothespin. Use red marker if you’d like to add in cheek blush.


            2. Make a hank of embroidery floss by loosely wrapping floss around hand and then removing when you have enough for hair. Cut through end loops and use glue gun to top of clothespin for hair.


            3. Cut a rectangle piece of fabric long enough to wrap around the worry doll’s neck once and wide enough to cover doll. Use thumb tack to secure dress at neck.


            4. If you would like to add arms, cut matchsticks small enough for the doll’s arm. With micropoint or sharp scissors make small slits in dress where arms go. Add a dab of glue to ends of matchsticks and insert into slits.


            NOTE: There is a lot of gluing in this project. Please get an adult if you need help with this.

            Projects - Make Your Own Newspaper (The Landry News)

              This was probably one of our most successful projects.
              SUPPLIES
              newspaper template made from 8.5" x 11" white paper
              old magazines, etc.
              reference books - joke book, cookbook, nonfiction books
              pencils or pens
              coloring instruments - crayons, markers etc.
              double-sided tape

              INSTRUCTIONS
              Print the newspaper template on 8.5" x 11" white paper. (pic 1) Print enough for everyone. Tell everyone the name of the project. It worked well when we asked everyone to start by coming up with a name for their newspaper and printing it in big letters over the top.

              Then they were asked to fill in each block with a different article - examples would be:

              - an upcoming event at home or in school
              - community news
              - recipe
              - joke
              - sports scores
              - poll of friends
              Then participants can fill in the squares. They can draw and color illustrations or cut out pictures from old magazines and tape them in place with double-sided tape. (pics 2-5)

              When everyone's done, sit back in the circle and pass around everyone's newspaper. It really is a lot of fun!
              Click on pictures to enlarge: